目次
ウィジェットを垂直方向に配置する
ウィジェットを垂直方向かつ上から下に向かって配置したい場合は、
pack メソッドの side オプションに "top" を指定します
(side のデフォルト値は "top" なので、
この場合の side オプションは省略しても問題ありません)。
もし、垂直方向でも下から上に向かって配置したい場合は、"bottom" を指定してください。
Example
source code
from tkinter import Tk
from tkinter import ttk

class MainFrame(ttk.Frame):
    def __init__(self, master):
        super().__init__(master)
        self.pack()
        self.make_style()
        self.create_widgets()

    def make_style(self):
        s = ttk.Style()
        s.configure("TLabel", padding=8,
                              font=("", 10, "bold"),
                              background="#ffff00",
                              borderwidth=2,
                              relief="ridge")

    def create_widgets(self):
        label1 = ttk.Label(self, text="Armadillo")
        label1.pack(side="top")

        label2 = ttk.Label(self, text="Bear")
        label2.pack(side="top")

        label3 = ttk.Label(self, text="Cat")
        label3.pack(side="top")

root = Tk()
root.title("Tkinter win")
frame = MainFrame(root)
frame.mainloop()
result

ウィジェットを水平方向に配置する
ウィジェットを水平方向かつ左から右に向かって配置したい場合は、
pack メソッドの side オプションに "left" を指定します。
もし、水平方向でも右から左に向かって配置したい場合は、"right" を指定してください。
Example
source code
from tkinter import Tk
from tkinter import ttk

class MainFrame(ttk.Frame):
    def __init__(self, master):
        super().__init__(master)
        self.pack()
        self.make_style()
        self.create_widgets()

    def make_style(self):
        s = ttk.Style()
        s.configure("TLabel", padding=8,
                              font=("", 10, "bold"),
                              background="#ffff00",
                              borderwidth=2,
                              relief="ridge")

    def create_widgets(self):
        label1 = ttk.Label(self, text="Armadillo")
        label1.pack(side="left")

        label2 = ttk.Label(self, text="Bear")
        label2.pack(side="left")

        label3 = ttk.Label(self, text="Cat")
        label3.pack(side="left")

root = Tk()
root.title("Tkinter win")
frame = MainFrame(root)
frame.mainloop()
result

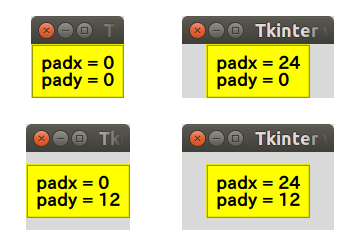
padx, pady オプション
ウィジェットの外側の余白を変更したい場合は、
padx 及び pady を設定します。
左右については padx を、
上下については pady に数値を指定します。
padx, pady を省略すると、それぞれの余白は 0 (余白無し) となります。
Example
source code
from tkinter import Tk
from tkinter import ttk

print("padx (0, 1, 2, ...) > ", end="")
padx = int(input())

print("pady (0, 1, 2, ...) > ", end="")
pady = int(input())

root = Tk()
root.title("Tkinter win")

s = ttk.Style()
s.configure("TLabel", padding=8,
                      font=("", 10, "bold"),
                      background="#ffff00",
                      borderwidth=2,
                      relief="ridge")

fmt = "padx = {:d}\npady = {:d}"
label1 = ttk.Label(root,
                   text=fmt.format(padx, pady))
label1.pack(padx=padx, pady=pady)

root.mainloop()
result
padx,
pady のそれぞれに「任意の値」を指定したときの実行例:
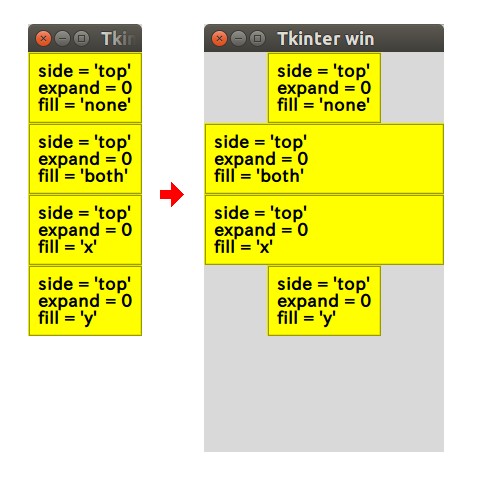
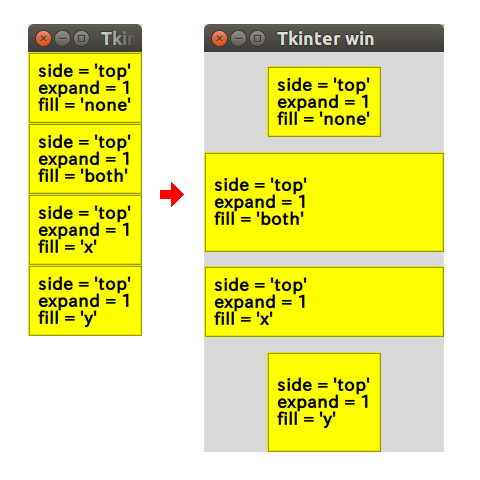
fill オプション
fill オプションを設定すると、
メインウィンドウのサイズを変更したときに、
配置したウィジェットのサイズの振る舞いを変更することができます。
"none" の場合は、メインウィンドウのサイズを変更しても、
初期のウィジェットのサイズを保持します。
fill を省略すると、"none" のときと同様な振る舞いをします。
"x", "y", "both" の場合は、メインウィンドウのサイズを変更すると、
ウィジェットのサイズも変更されます。
ただし、サイズが変更される振る舞いは side, expand オプションの値に依存するので、詳しくは次の example を参照ください
(補足で、垂直方向と水平方向の両方のサイズを変更するようにしたい場合は、expand=1 とする必要があります)。
Example
source code
from tkinter import Tk
from tkinter import ttk

print("side (top, bottom, left, right) > ", end="")
side = input()

print("expand (0, 1) > ", end="")
expand = int(input())

root = Tk()
root.title("Tkinter win")

s = ttk.Style()
s.configure("TLabel", padding=8,
                      font=("", 10, "bold"),
                      background="#ffff00",
                      borderwidth=2,
                      relief="ridge")

fmt = "side = '{:s}'\nexpand = {:d}\nfill = '{:s}'"
fill = "none"
label1 = ttk.Label(root,
                   text=fmt.format(side, expand, fill))
label1.pack(side=side, expand=expand, fill=fill)

fill = "both"
label2 = ttk.Label(root,
                   text=fmt.format(side, expand, fill))
label2.pack(side=side, expand=expand, fill=fill)

fill = "x"
label3 = ttk.Label(root,
                   text=fmt.format(side, expand, fill))
label3.pack(side=side, expand=expand, fill=fill)

fill = "y"
label4 = ttk.Label(root,
                   text=fmt.format(side, expand, fill))
label4.pack(side=side, expand=expand, fill=fill)

root.mainloop()
result
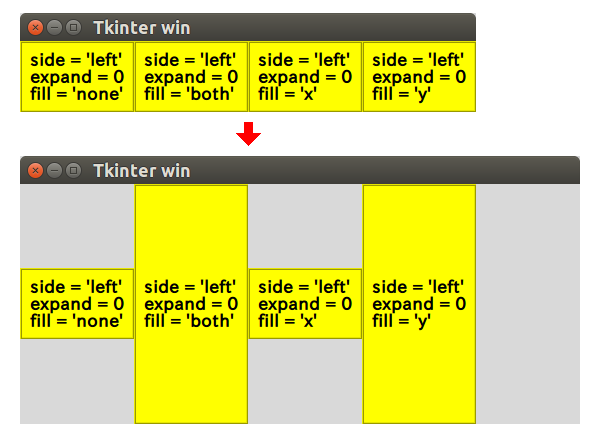
side="top",
expand=0 を指定したときの実行例:
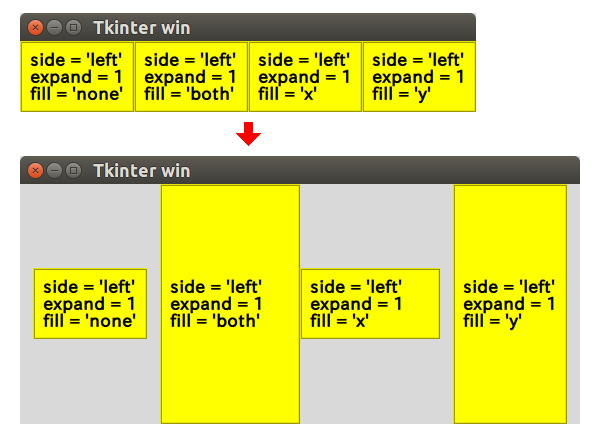
side="top",
expand=1 を指定したときの実行例:
side="left",
expand=0 を指定したときの実行例:
side="left",
expand=1 を指定したときの実行例:
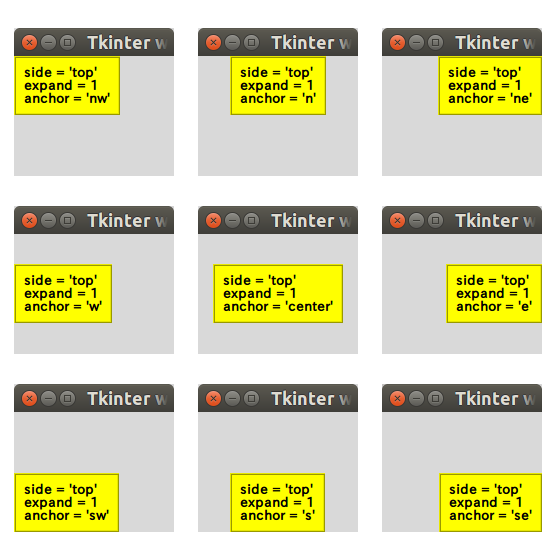
anchor オプション
anchor オプションを設定すると、
メインウィンドウのサイズを変更した時に、
区画内でウィジェットの配置する位置を変更することができます。
オプションの値は "nw", "n", "ne",
"w", "center", "e",
"sw", "s", "se" のいずれかを指定します。
それぞれ、区画内で「左上」、「上」、「右上」、「左」、「中央」、「右」、「左下」、「下」、「右下」に配置されます。
ただし、配置される振る舞いは side, expand オプションの値に依存するので、詳しくは次の example を参照ください。
また、anchor を省略すると、"center" のときと同様な振る舞いをします。
Example
source code
from tkinter import Tk
from tkinter import ttk

print("side (top, bottom, left, right) > ", end="")
side = input()

print("expand (0, 1) > ", end="")
expand = int(input())

print("anchor (nw, n, ne, w, center, e, sw, s, se) > ", end="")
anchor = input()

root = Tk()
root.title("Tkinter win")
root.geometry("160x120")

s = ttk.Style()
s.configure("TLabel", padding=8,
                      font=("", 8, "bold"),
                      background="#ffff00",
                      borderwidth=2,
                      relief="ridge")

fmt = "side = '{:s}'\nexpand = {:d}\nanchor = '{:s}'"
label1 = ttk.Label(root,
                   text=fmt.format(side, expand, anchor))
label1.pack(side=side, expand=expand, anchor=anchor)

root.mainloop()
result
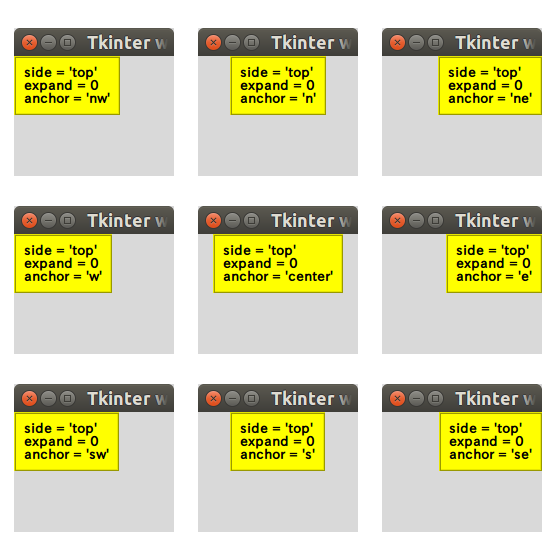
side="top",
expand=0,
anchor に「任意の値」を指定したときの実行例:
side="top",
expand=1,
anchor に「任意の値」を指定したときの実行例: